このセクションではプレイヤーの色と大きさ、位置を決めて描画をします。
プレイヤー変数の初期化
プレイヤーの色を定数PLAYER_COLOR、中心のX座標、Y座標、サイズを変数px、py、psとして保持します。
// 色
const BACKGROUND_COLOR = "hsl(200deg, 100%, 70%)";
const PLAYER_COLOR = "hsl(0deg, 100%, 60%)";

// プレイヤー変数
let px = 70;
let py = 50;
let ps = 20;// 色
const BACKGROUND_COLOR = "hsl(200deg, 100%, 70%)";
const PLAYER_COLOR = "hsl(0deg, 100%, 60%)";
// プレイヤー変数
let px = 70;
let py = 50;
let ps = 20;プレイヤーの本体の描画
プレイヤーの本体を描画するdraw_player関数を作成して、draw_player関数を実行します。
// 背景の描画
function draw_background() {
  ctx.fillStyle = BACKGROUND_COLOR;
  ctx.fillRect(0, 0, cvs.width, cvs.height);
}

// プレイヤーの描画
function draw_player() {
  ctx.fillStyle = PLAYER_COLOR;
  ctx.fillRect(px - ps / 2, py - ps / 2, ps, ps);
}

draw_background();
draw_player();// 背景の描画
function draw_background() {
ctx.fillStyle = BACKGROUND_COLOR;
ctx.fillRect(0, 0, cvs.width, cvs.height);
}
// プレイヤーの描画
function draw_player() {
ctx.fillStyle = PLAYER_COLOR;
ctx.fillRect(px - ps / 2, py - ps / 2, ps, ps);
}
draw_background();
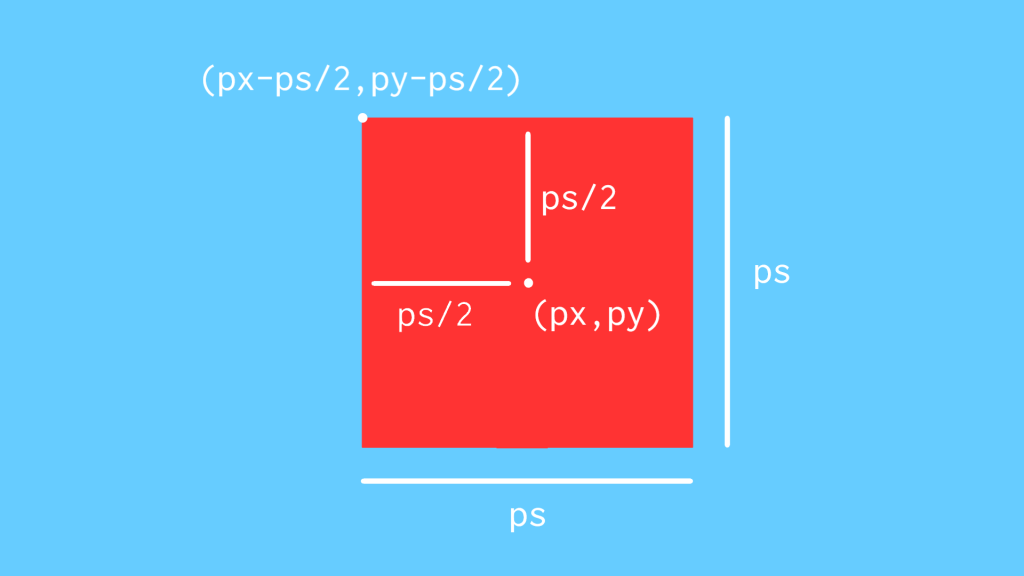
draw_player();23行目のfillRect()の第1引数、第2引数について確認します。今回はプレイヤーを中心座標(px, py)の幅と高さがpsの四角形にします。そのため以下の画像のようにプレイヤーの左上の頂点の座標は(px - ps / 2, py - ps / 2)になります。

プレイヤーの枠線の描画
プレイヤーに白の枠線を描画します。デフォルトの枠線は細いので、まずキャンバスの枠線の太さを変数で定義して、新しく作成する初期化処理をする関数でキャンバスの枠線の太さを設定します。その後、draw_player関数で枠線の描画を行います。
キャンバス変数の初期化
枠線の太さを変数line_widthで保持します。
// 色
const BACKGROUND_COLOR = "hsl(200deg, 100%, 70%)";
const PLAYER_COLOR = "hsl(0deg, 100%, 60%)";

// キャンバス変数
let line_width = 2;// 色
const BACKGROUND_COLOR = "hsl(200deg, 100%, 70%)";
const PLAYER_COLOR = "hsl(0deg, 100%, 60%)";
// キャンバス変数
let line_width = 2;初期化処理
初期化処理を行うinit関数を作成して、キャンバスの枠線の太さを設定します。そして、init関数をdraw_background関数の前で実行します。
// 初期化処理
function init() {
  ctx.lineWidth = line_width;
}

// 背景の描画
function draw_background() {
  ctx.fillStyle = BACKGROUND_COLOR;
  ctx.fillRect(0, 0, cvs.width, cvs.height);
}

// プレイヤーの描画
function draw_player() {
  ctx.fillStyle = PLAYER_COLOR;
  ctx.fillRect(px - ps / 2, py - ps / 2, ps, ps);
}

init();
draw_background();
draw_player();// 初期化処理
function init() {
ctx.lineWidth = line_width;
}
// 背景の描画
function draw_background() {
ctx.fillStyle = BACKGROUND_COLOR;
ctx.fillRect(0, 0, cvs.width, cvs.height);
}
// プレイヤーの描画
function draw_player() {
ctx.fillStyle = PLAYER_COLOR;
ctx.fillRect(px - ps / 2, py - ps / 2, ps, ps);
}
init();
draw_background();
draw_player();枠線の描画
まず、枠線の色を定数PLAYER_STROKE_COLORで保持します。
// 色
const BACKGROUND_COLOR = "hsl(200deg, 100%, 70%)";
const PLAYER_COLOR = "hsl(0deg, 100%, 60%)";
const PLAYER_STROKE_COLOR = "hsl(0deg, 0%, 100%)";// 色
const BACKGROUND_COLOR = "hsl(200deg, 100%, 70%)";
const PLAYER_COLOR = "hsl(0deg, 100%, 60%)";
const PLAYER_STROKE_COLOR = "hsl(0deg, 0%, 100%)";次に、draw_player関数で枠線の描画をします。今回は枠線を本体よりも先に描画します。
// プレイヤーの描画
function draw_player() {
ctx.strokeStyle = PLAYER_STROKE_COLOR;
ctx.fillStyle = PLAYER_COLOR;
ctx.strokeRect(px - ps / 2, py - ps / 2, ps, ps);
ctx.fillRect(px - ps / 2, py - ps / 2, ps, ps);
}// プレイヤーの描画
function draw_player() {
ctx.strokeStyle = PLAYER_STROKE_COLOR;
ctx.fillStyle = PLAYER_COLOR;
ctx.strokeRect(px - ps / 2, py - ps / 2, ps, ps);
ctx.fillRect(px - ps / 2, py - ps / 2, ps, ps);
}以上でプレイヤーの描画設定が終わりました。最終的にmain.jsは以下のようになります。
// 描画コンテキストの取得
let cvs = document.querySelector("canvas");
let ctx = cvs.getContext("2d");
// 色
const BACKGROUND_COLOR = "hsl(200deg, 100%, 70%)";
const PLAYER_COLOR = "hsl(0deg, 100%, 60%)";
const PLAYER_STROKE_COLOR = "hsl(0deg, 0%, 100%)";
// キャンバス変数
let line_width = 2;
// プレイヤー変数
let px = 70;
let py = 50;
let ps = 20;
// 初期化処理
function init() {
ctx.lineWidth = line_width;
}
// 背景の描画
function draw_background() {
ctx.fillStyle = BACKGROUND_COLOR;
ctx.fillRect(0, 0, cvs.width, cvs.height);
}
// プレイヤーの描画
function draw_player() {
  ctx.strokeStyle = PLAYER_STROKE_COLOR;
  ctx.fillStyle = PLAYER_COLOR;

  ctx.strokeRect(px - ps / 2, py - ps / 2, ps, ps);
  ctx.fillRect(px - ps / 2, py - ps / 2, ps, ps);
}
init();
draw_background();
draw_player();// 描画コンテキストの取得
let cvs = document.querySelector("canvas");
let ctx = cvs.getContext("2d");
// 色
const BACKGROUND_COLOR = "hsl(200deg, 100%, 70%)";
const PLAYER_COLOR = "hsl(0deg, 100%, 60%)";
const PLAYER_STROKE_COLOR = "hsl(0deg, 0%, 100%)";
// キャンバス変数
let line_width = 2;
// プレイヤー変数
let px = 70;
let py = 50;
let ps = 20;
// 初期化処理
function init() {
ctx.lineWidth = line_width;
}
// 背景の描画
function draw_background() {
ctx.fillStyle = BACKGROUND_COLOR;
ctx.fillRect(0, 0, cvs.width, cvs.height);
}
// プレイヤーの描画
function draw_player() {
  ctx.strokeStyle = PLAYER_STROKE_COLOR;
  ctx.fillStyle = PLAYER_COLOR;

  ctx.strokeRect(px - ps / 2, py - ps / 2, ps, ps);
  ctx.fillRect(px - ps / 2, py - ps / 2, ps, ps);
}
init();
draw_background();
draw_player();実行結果
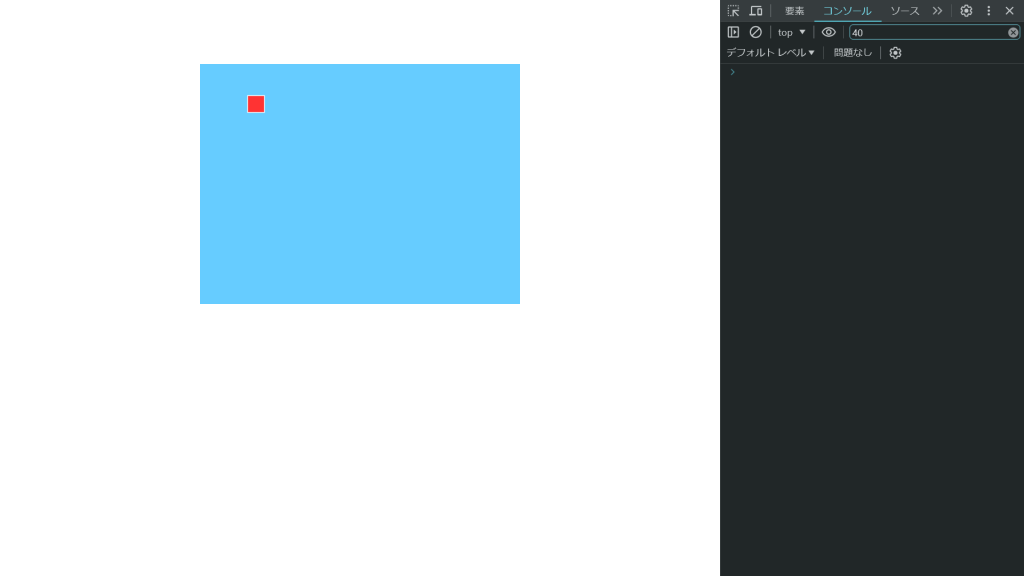
Chromeに移動してindex.htmlを更新します。実行結果は以下の画像のようになります。

コメント
コメントはまだありません。